Happy Easter Banner

8 comments
Did you see my Easter Banner on yesterday's post?  
As promised, here is the tutorial :-D

I was walking through Michael's and saw these cute wooden frames {and they were only $1 each}.  At the time, I had no clue what I wanted to do with them, but I knew that I had to buy a bunch :) 

I was trying to decide on what kind of banner I wanted to make, when it dawned on me that the wooden frames would be perfect!
I didn't like the "natural" look of the frames, so I painted them white. {this was after I originally stained them... but I still wasn't loving the way they looked... so it was on to plan B... haha}
Once they were painted, I sanded them down a bit to give them that distressed look {which I love}

Now onto the paper and lettering
 
I just used some cute scrapbook paper and foam letters I had.  It lucked out that the color of the letters matched the paper so perfectly!
After measuring the size of the frame opening, I cut my paper into 12 equal squares.
Once all the paper was cut, it was time to glue them onto the frames
 
Flip the frame over, add a little Mod Podge {around the inside edge} and stick on your paper
Here they are, all dry and ready to add the letters
I had it really easy, {since my letters were foam stickers} I just pealed and placed.  I left 1 blank space, so there would be a separation between Happy and Easter

Lastly, I added white twine.  I just weaved it through all the frames and hung it up on my mantel.
Once I added my cute bunny statue and my Easter {pom pom} egg, my mantel was finished and ready for Easter!
 HAPPY CRAFTING!!!
(to see where I've linked up - click here!!)

Easter {pom pom} Egg

Comments
I've had such a hard time keeping up with the blog this past week!!  I start every day thinking, "I'll write my post today", but then I start doing something else. 

With 4 weeks until I'm due, I've been trying to tie up all the lose ends.  I'm {slowly} putting the nursery together, cleaning up my craft area and writing thank you cards... then there are the everyday "mom" duties... throw in a few play dates and working out {yes, I'm still working out} and my days are packed! 

Did you notice that I haven't even mentioned crafting or blogging?  Besides this blog, I also have my personal family blog - which also gets neglected :/
I've been making all sorts of fun crafts and getting my house decorated for Easter {which I'll be hosting again this year}.  So between decorations, dinner menus, table settings and Easter baskets, I'll have lots of fun things to share with you all :)

Now, that I've jabbered on and on and on, I'll finally get onto today's post, which is my VERY EASY Easter Pom Pom Egg {in a frame} :-D

First buy some pom pom's - {I had some left over from another project}
{I wanted to use buttons, because I've seen soooo many cute examples, BUT I didn't have any, so I decided to use pom pom's instead}
Next trace out the shape of your egg onto your paper {I used white cardstock}

Now take your glue gun and start adding the pom poms
I glued them around the outside first
Then I filled in the middle.
Now I took the glass out of my frame and added a few stickers that said 
HOP hop!
Placed it on my mantel {see my cute Easter Banner?  I'll be posting the tutorial on that tomorrow!!}
HAPPY CRAFTING!!
(to see where I've linked up - click here!!)

Easter Onesie - Girl

12 comments
It's that time of year... time to HOP HOP HOP into Spring! 
For those of you that are new to my blog, I wanted to share some of the adorable onesies I made with all of you.  If you've been following my blog, then this will all sound a little repetitive {sorry}!

Background story:  My best friend is having, had a little girl last month, so as a baby shower gift I made all these holiday onesies for her daughter to wear.   {If you want to see the other onesie's I've made for her, just click here---> Valentine's Day Onesie-Girl and/or here---> St. Patrick's Day Onesie-Girl }
Anyhow, onto how I made them...
It was pretty simple to make, I used my Silhouette Cameo, but you could make the designs from any editing program that you already have.   I purchased the designs from the Silhouette online store and then made my template. 

I wanted to make the onesie look a little girlier, so I added the heart behind the bunnies.   Cute huh?
A few pointers:
  1. Make sure to PRE-WASH your onesie/clothing item first
  2. Make sure to print your template out on normal paper first to confirm that you have the appropriate size/shape for the garment you are using.
  3. VERY IMPORTANT!! Make sure to MIRROR your image BEFORE you print the final image on your iron-on sheets.  Otherwise everything will be backwards :/
Next, either have your Silhouette cut out the image, or take a pair of scissors and cut it out yourself 
See how the image is backwards? 
That's CORRECT!
Just flip them over and iron it on.  Then you are DONE :)

FRONT
 
BACK
I hope this inspires you to make something adorable for your little one :)
HAPPY CRAFTING!
(to see where I've linked up - click here!!)

Friday's Fantastic Finds {desserts}

Comments


I can't believe I haven't posted since Monday!  I've been out of commission... Late Monday night I scratched my eye - badly {still not sure how it happened}, but it wouldn't stop burning or watering :/  On Tuesday I went to Urgent Care and they confirmed that I scratched my cornea... luckily with a little ointment {and no pirate patch} I would be back to normal in 2-3 days.

So that put me out of commission, no crafting OR blogging {since trying to focus my eye on anything made it water and burn.}  By Thursday morning my eye was feeling MUCH better, which allowed me to finally link up to all the parties I'd missed and starting crafting again!

I'll have lots of fun crafts posted next week {maybe I'll even post some this weekend}, but today is dedicated to my fantastic finds!

As I mentioned last week, my pregnancy cravings have me wanting as much peanut butter and chocolate I can find!  I must admit, my FAV candy is Reese cups, so it's not surprising that I love anything with those same flavors!  :-D  So without further ado...

**REMINDER**
I'll be sure to tell you what next weeks theme is (at the bottom of each weeks post), so if you have any suggestions (your personal creations OR anything you saw, tried, loved or just wanted to share), please leave a comment with all the info and a link to what you thought was FANTASTIC!

Also, if you want to PIN anything (which we all love doing), please click on the specific link and PIN from the original site... as they deserve ALL of the credit!  Thanks! 
******
(in no particular order)
Desserts!

Normally I write something about each find, but this week I think the pictures and titles speak for themselves.  

The only thing I can say is:
Chocolate Chip Cookie Dough Cupcakes --> by The Girl Who Ate Everything 
 YUM!

Tagalong Peanut Butter Trifle --> by What's Cooking Love?
YUM!

Reese's Cheesecake Brownies --> by Susannah's Kitchen
YUM!

Pretzel Bottomed Reese's Peanut Butter Cup Cookie Pie --> by AKM Designs and Delights
and YUM!!!!!

next week...
It's 5 weeks left until my little girl's arrival and I still have so much to do!  I have all these great DIY furniture projects I want to get done I want my HUSBAND to get done, but I know if we he doesn't finish them BEFORE the baby is due, then they probably won't get done for quite awhile...

So next week's Fantastic Finds will be dedicated to:

DIY Furniture Projects!

Hopefully it will give me us the motivation to get our projects done :-D

Remember, if you have any suggestions, please leave a comment with your info and I'll check it out - THANKS!

Spring Flower Wreath

28 comments


I had every intention of making a wreath for St. Patty's day but as I've mentioned before... life gets in the way sometimes (aka my 18month old angel - haha).  Now with Easter around the corner I was determined to make a wreath :-D

First things first, you'll need to make some flowers
To do that, you'll need some felt
There are tons and tons and tons of fantastic tutorials on how to make felt flowers.  You can make so many different varieties, but here is how I made mine :)
  (rose flower tutorial - click here)
Simple huh?
Look how pretty they all look!
 
Now it's time to glue the flowers onto the wreath.  I wanted them off to the side a bit, but place them on the wreath however you'd like :) 
 
If you like, you can hang it up just like this.  However, I wanted to add a little something extra.  

I added a little banner with the word SPRING.  I was originally going to put EASTER, but then decided that if it said Spring, I could probably keep it up longer :-D
For the banner I used some scrapbook paper and letter cut-outs that I had.
Cut the paper into triangles.  Glue on the letters.
Add the ribbon.

Now add to the wreath.

DONE :)
Oh yea, I also added those 2 wooden birds.  They were a different color originally (much lighter), but I thought they would like nice if they were stained.  Of course after I stained them and added them to the wreath I realized that they were the same color as the wreath {sigh}.... oh well

Still looks good :)

HAPPY CRAFTING!
(to see where I've linked up - click here!!)

Friday's Fantastic Finds {st. patty's day}

2 comments
Wow, I'm way behind today!!! I meant to write this post yesterday, but instead I linked up to a bunch of fantastic parties (check them out here).  Then I was going to write it last night, but as I mentioned earlier in the week, my hubby and I started watching a new show (Game of Thrones) and we are sooo addicted!  We stayed up until 1am watching 3 more episodes (only 2 more and we are all caught up)!

Why didn't I write it this morning you ask?  Well if you read my I Wish Wednesday post, my hubby is going camping with the boys... but who do you think has to pack up all the food - his wonderful wife! haha.  Now that they are off and my munchkin is napping, I finally have a free moment...

So without further ado.... onto this week's fantastic finds!

Since St. Patty's day is tomorrow, I thought I'd do a little roundup of the fantastic St. Patrick's Day crafts, food, tutorials, etc that I've found in this wonderful blogging world of ours :)

**REMINDER**
I'll be sure to tell you what next weeks theme is (at the bottom of each weeks post), so if you have any suggestions (your personal creations OR anything you saw, tried, loved or just wanted to share), please leave a comment with all the info and a link to what you thought was FANTASTIC!

Also, if you want to PIN anything (which we all love doing), please click on the specific link and PIN from the original site... as they deserve ALL of the credit!  Thanks! 
******
(in no particular order) 
St. Patrick's Day Projects!

What a cute and easy way to add a little green to your house.  I love all the colorful buttons, plus it seemed pretty easy to make, which means that all those last minute crafters can still make something festive for the big day!

I love love love these easy NO-SEW pillows!  You have to go and check them out - they seem super simple to make, which means I can make pillows for every holiday and not even break a sweat! :)

My favorite part of this banner was that she used book pages instead of just plan paper.  I think it added the perfect touch!  

Photobucket
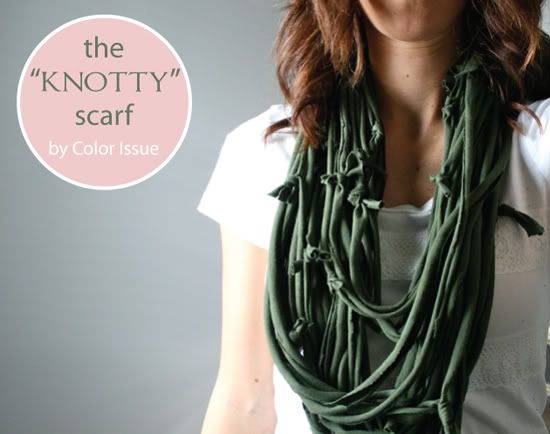
As soon as I saw this scarf I knew that I had to make it for my sister who would LOVE IT!  It's perfect for St. Patty's day, but even more perfect for every day. The tutorial is super easy to follow - which is always a plus.  check out more colorful inspiration over at The Color Issue!!!
 
Rainbow Cake --> Alderberry Hill

OMG, this cake looks awesome!  I love rainbows and I love this cake,  it's so creative and festive... plus it looks yummmmerss!!!!!

How cute is this onesie?  I love the lips and clover, such a fantastic idea!  I think I need to make this next year... but in my size :)

I saw this wreath and told my hubby "I'm making that!!" It's sooo cute and super creative.  Perfect addition to any St. Patty's Day!
 
next week...
So I haven't have many pregnancy cravings, BUT lately I've been noticing every yummy cupcake, brownie, pie, pastry etc.  But not just any dessert, specifically stuff that includes peanut butter and chocolate...mmmmmmmmm!  So next week's Fantastic Finds will be dedicated to:

Desserts!

Remember, if you have any suggestions, please leave a comment with your info and I'll check it out - THANKS!
Related Posts Plugin for WordPress, Blogger...