I Wish Wednesdays!

Comments

“All our dreams can come true – if we have the courage to pursue them.”– Walt Disney

One thing that we all have in common is wishes.

There are the little every day wishes
"I wish I could lose those last 10lbs!"
"I wish my daughter wouldn't jump on the couch"
"I wish it was sunny"
"I wish my hubby didn't work so late"

There are the BIG important wishes
"I wish I didn't have to worry about money"
"I wish I could find a good paying job"
"I wish I had a bigger house"
"I wish there was a cure for...(fill in the blank)"

There are the F*U*N wishes
"I wish I could travel & explore the world"
"I wish I could get a massage - EVERY DAY"
"I wish I could eat all I want and never gain a pound!"

You get the point.

Anyhow, I thought it would be fun to dedicate Wednesdays to dreams & wishes, big or small! (I might throw in a few inspirational and fun quotes too!)

“Don’t be afraid of the space between your dreams and reality. If you can dream it, you can make it so.” – Belva Davis

Today, here is what I'm wishing:

I wish I could have sushi for dinner tonight
I wish I could have a glass of red wine
 
(we are members of their wine club, so we have bottles just stacking up... unopened)

Lastly, after sushi for dinner and a glass of red wine, I wish I could just sit back and relax
in a hot tub...  :)

Now, all of these wishes WILL become reality... in about 8 weeks... once this little munchkin is born.  But until then, I can only wish!

What are you wishing for today?

Wood Sign - Baby Boy

9 comments
 
Everyone always talks about "wedding season", but what about "baby season"?  I feel like everyone I know is having a baby this year (including myself), and what comes along with "baby season'?  Baby Showers and Gifts! 

My sister-in-law is having a little boy in April (which is so exciting, because I'll finally be an Auntie!)  Anyhow, I was looking at her boards on Pinterest and saw this sign made by Swoozies.com,  and I immediately knew that I was going to make her one myself.  

First I created my template on my Silhouette Cameo
I like to fill in the letters with the color vinyl I'm going to use, that way I get a better idea of how the final product will turn out.
The fonts I used were: 1)LW Headline  2)LD Gregarious  3)LD Forever Friends  4)SNF Petite Hand (all of these fonts were purchased from the Silhouette online store)

Next I took my 11x11 wood board - I painted, sanded and prepped it for the vinyl letters.  For the full tutorial, you can CLICK HERE, when I made my Military Subway Art.

Once all the letters were transferred, I applied a few coats of Mod Podge over the whole thing and it was done.  Very easy and inexpensive.
I think she'll love it! :)
HAPPY CRAFTING!
(to see where I link up - click here!! 

Bridal Shower Fiesta!

6 comments
Everyone loves a Bridal Shower, especially one filled with great friends, festive decorations and yummy cupcakes! 

This bridal shower was for a very good family friend and the theme was a Mexican Fiesta!  She was getting married in Punta Mita, Mexico, so all the decorations were coordinated to match the wedding colors - Yellow, Orange & Green!  


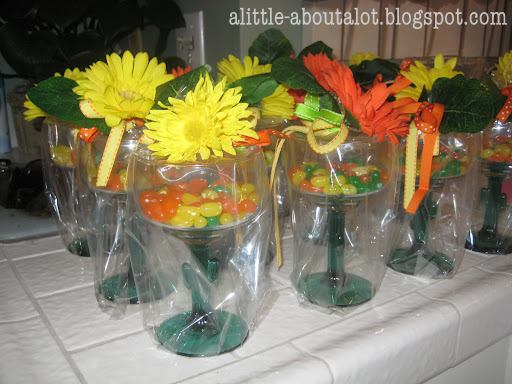
My Mother-in-law made these adorable party favors.  
 
 Cactus Margarita glasses filled with colorful jelly beans
topped off with vibrant flowers and colorful ribbon

Next up were the drinks.  We couldn't have a Fiesta without a few Margaritas!
I used the same ribbon we used on the party favors and tied them into little bows, which I secured to the Margarita glasses with a little bit of super glue. (which don't worry, the glue will peel right off the glasses once you're ready to wash/clean them).
Now time for dessert!
CUPCAKES & COOKIES
yummy yummy!
I made cupcakes and sugar cookies.
After making the cupcakes, I used 3 colors (green, yellow & orange) to frost all of them
I used 2 different size flower shapes to cut all the flowers out of the sugar cookies.  Then I decorated them with frosting... just something fun looking.
Next, I assembled.
I think they turned out really cute
Especially next to all the other fantastic decorations!
The Fiesta was a success and the Bride-to-be was glowing!
(to see where I link up - click here!! 

Military Subway Art - Tutorial

37 comments
 
Last week my Aunt threw a homecoming party for my cousin, who has been in the Air Force for the past 4 years.  He has completed his service and is finally back home!  I wanted to give him a gift... something that he could always look at and be reminded of the service he provided to our country.
 
Subway Art was my first thought!  My husband and I compiled a list of words that we thought suited him (and someone in the military), next we got a list of all the places that he was stationed in the past 4 years, along with his first and last date of service.

I created the template on my Silhouette Cameo.  I played with the fonts, sizes and direction until I had the layout exactly how I wanted it.
I like filling in the words with colors, instead of just looking at stencils/outlines.  It give me a better idea of how the finished product will look :)

The fonts I used were: 1) Stencil  2) Braggadocio  3) American Typewriter  4) LW Headline  5) SNF Petite Hand  (#1-3 are fonts provided in the Silhouette and # 4-5 were purchase from the Silhouette online store)

Next, I got my wood, paint and brush and got to work.

After the paint dried, I took some sand paper and sanded the whole thing a bit, especially around the edges.  Sand it as little or as much as you think looks right for your project (sorry, I forgot to take a picture after sanding it).
While I was waiting for the paint to dry, I cut my template out and got it all ready to transfer.  Since I was using 2 different colors, I cut 2 separate templates

1) the whole pattern in black vinyl
2) just the 5 words in tan vinyl

Since I didn't want some of the words (in black) to transfer, I laid some paper over them, so I could transfer all the other letters.

This was how it looked after the 1st layer was done.
Next, I placed the tan layer right on top and lined up the letters with the blank spaces and transferred them next.
All done.  
Time to make the next one
Yes, I made two 
I thought that my Aunt would like one (probably more) than my cousin would.  haha

Additional Info: To be honest, I had some trouble getting the vinyl to stick to the wood, I think it was because I tried to place the vinyl too soon after sanding the wood - there must have been a thin layer of dust that was preventing the transfer.  Anyhow, my remedy was this:  After sanding it, I applied a thin layer or Mod Podge, let it dry, then applied the vinyl.  After the vinyl was placed, I then put another thin layer of Mod Podge down over all the letters.  Once all the letters were placed, I applied another 2 coats of Mod Podge over the whole project to ensure that none of the letters would fall off, plus it gave it a nice finished look that I really liked.

I'd love to hear any troubles & remedies you'd have when trying to apply vinyl too!
(to see where I've linked up - click here!)

Wine Cork Monogram Letter

34 comments
I like to drink wine and I've saved all my corks.  Finally I've created something with all of them, okay, not all of them, I still have quite a few left... like I said, I like to drink wine - haha :)
Do you have TONS of wine corks sitting around your house?  Do you keep telling yourself, I'll do "something crafty" with them... just like me, you've probably seen this idea (and many more) everywhere!  I've seen it on Pinterest, Etsy, Google searches, in retail stores, etc...  so I thought it was finally time to make my own!
I was in Michael's (buying items for a different craft), when I saw these wooden letters for $1.99, so I figured it was a sign - time to get gluing!  I bought an "L" for our last name :)

This craft was SUPER cheap - the cost of the wooden letter and that's it! (assuming that you already have your collection of wine corks, so I guess it's a really expensive craft, seeing as the wine probably wasn't cheap... but at least you got wine out of the deal - right? haha) 
I placed all the corks on the "L" before I started gluing, so I knew how the rows would look and how many corks I'd need.
Then just start gluing! (I used my glue gun) For some of the corks on the edges, I glued the sides of 2 corks together, then glued the bottoms down, so they wouldn't fall off.
 
Then find a nice place to display it!

I think I want to go back and buy the letters W-I-N-E and then display it above my wine bar.  Of course I'll need A LOT more corks for that project... seeing as I'm currently pregnant, that craft will just have to wait.
Happy Crafting!
(to see where I've linked up - click here!)

Valentine's Day Card - Iheartu

Comments
I can't believe it's already Valentine's day!  I meant to get this posted a little earlier, but hey, better late then never - right?  Well I wanted to send out Valentine's cards to the grandparents and aunties, but I wanted it to be something cute and personal, so here is what I came up with.

These are really easy to make - promise! The hardest part was getting my munchkin to stand still long enough to get a few good pictures - haha.

All you need is some felt, a glue gun and a shirt.  (Now you can free-hand your heart, but since mine are always lop-sided, I used this wood heart that I had, as my stencil)
Cut out your hearts
Cut out the wording you'd like - I went with a very simple I <3 U
Now, glue the wording to the hearts
When it came to putting the hearts on the shirt, I just used a few safety pins.  I thought about putting a few small stitches instead, but I figured it would be much easier (and quicker) to pin it, since I'd have to switch the pattern 3 times.

Next came the hardest part - getting a good picture.  As you can see... I took a few!
I picked out my 3 favorites, created my collage (I used Picasa - free editing program), then added some wording and that was it.
Lastly, after printing and cutting out my collage, I glued it onto some red scrapbook paper... I thought I was done, but I felt that something was missing... so I punched a hold in the top and added a little XOXO ribbon.  Now instead of just some photos, it was a bookmark! 
I think they turned out so cute.  Something easy and simple and I know that the grandparents will LOVE it!

Hope you get to spend today with the people you love
Happy Valentine's Day!!

Valentine's Mantel Ideas

Comments
 
I'm always seeing these fantastic decorated fireplace mantels and I decided that it was time for me to spruce up my mantel! 

I tried to keep it simple.  I found these great LOVE sayings, printed them out and put them in simple black frames.  You can download them for FREE here: The Girl Creative and here: 4shared.com
For the larger frame, I decided not to use a background, instead I glued a few felt roses (left over from my wreath) right onto the frame to add a little something.
For the smaller frame, I just printed my LOVE saying at 90% of the original size and taped it onto some pretty scrapbook paper I had - then popped it in the frame.
Next I hung up my Valentine's Wreath w/felt roses (tutorial here) on the mirror and added a few chocolates to my vase (along with two of my favorite pictures in pretty frames) and VOILA pretty decorated mantel!
I hope to make this a trend, redecorating the mantel for all the different holidays and occasions!

Valentine's Wreath w/felt roses

1 comments
 
I really don't know why this took me sooo long to make.  It's VERY simple and should have taken an afternoon, but the combination of being 7 months pregnant, having a 16 month old and pure laziness, it took me a week!  Anyhow, this wreath is SUPER cute and like I said, SUPER simple - as long as you have a few (undistracted) hours to work on it.

First you buy felt, a LOT!  You can choose whatever colors you like, all pink, all red, all white, or a combo.  I actually wanted red, white and a soft pink, but all soft pink was sold out, so it was hot pink instead - but I think it still turned out fantastic!

There are so many flower tutorials out there, so I won't bore you with the specifics, but you cut your circles out (I used an old CD) and then you start cutting them into spirals.
Next you start rolling and rolling and rolling, until you have a table full of roses - like this!
Once they are all rolled up, time to pull out the handy dandy glue gun!
Now you just start the process of gluing them to the foam wreath.  I only covered the front and sides (not the back), since it was going to be hanging on the mirror above my fireplace, no point it covering what nobody will see.
 
 
Now you can use any type of ribbon or string to hang them up, but when I first saw this wreath on Pinterest, they used tulle and I loved the way it looked - so I just did the same
The great thing about this wreath, is depending on the color roses you choose, you can really make it for ANY occasion.  Maybe I'll make one using white, dark & light green for St. Patricks day...
Happy Valentine's Day!
Related Posts Plugin for WordPress, Blogger...